

The Truth About Ice Dams and How to Prevent Them
Ice dams have a reputation as a northern problem, but North Texas homeowners learned otherwise during the February 2021 and February 2023 freeze events, when sleet and freezing rain sat on roofs for days and attic heat did the rest. An ice dam is a ridge of ice that forms along the lower edge of a roof and blocks melting water from draining off the eave. That trapped water backs up under the shingles, finds the seams and fastener holes, and drips into the attic insulation, the wall cavities, and eventually the ceiling below. Most people blame the ice itself, but the real cause sits inside the house, in the form of warm air leaking into a cold attic. The good news is that ice dams are almost entirely preventable, and the work that prevents them also lowers your cooling bills during a Texas summer. Late summer and early fall are the right time to handle it, because attic work is easier to schedule now than in December and materials are readily available. Waiting until the first hard freeze warning means competing with every other homeowner in Tarrant and Johnson County for the same appointment slot. This guide explains what actually creates an ice dam, what prevents one, and what to look for on your own roof before the season turns.
What Causes Ice Dams on a Roof
An ice dam requires three ingredients working together: frozen precipitation sitting on the roof, a roof surface warm enough in the upper areas to melt it, and an eave cold enough to refreeze the runoff. The upper part of your roof deck sits directly over heated living space, so it absorbs warmth escaping from the house below. The eave and overhang extend past the exterior wall and sit over open air, which means they stay at or near outdoor temperature no matter what happens inside. Meltwater runs down the warm section, hits that cold band at the bottom, and freezes into a ridge that grows a little larger with every cycle. Once the dam reaches two or three inches tall, water pools behind it and sits on the roof instead of draining. Asphalt shingles are designed to shed water traveling downhill, not to hold standing water, so that pool eventually works its way underneath and into the structure.
The Attic Heat Loss That Causes Ice Dams
Heat loss into the attic is the single largest contributor to ice dams, and it rarely comes from one dramatic opening. It comes from dozens of small penetrations that add up: gaps around the top plates of interior walls, unsealed openings around plumbing vent stacks, recessed can lights that were never rated for insulation contact, the pull down attic ladder, and the chase around a fireplace flue. Warm air rises through those bypasses all winter and collects against the underside of the roof deck. That warm pocket raises the deck temperature above freezing even when outdoor air sits in the twenties, which is exactly the condition that melts the ice sitting on top. Homeowners often assume that adding more insulation solves this, and insulation certainly helps, but insulation slows heat transfer without stopping air movement. Blowing another twelve inches of cellulose over an unsealed attic floor is like putting a heavier blanket over a screen door. Air sealing has to come first, and then the insulation can do the job it was designed to do.
Ductwork running through the attic makes the problem considerably worse in most North Texas homes. Supply and return ducts in a vented attic carry conditioned air through the coldest part of the house in winter, and any leak at a boot connection or a failed mastic joint dumps heated air straight into the attic space. Older flex duct with degraded insulation sleeves radiates heat continuously even when the connections are tight. A furnace or air handler located in the attic contributes its own heat through the cabinet and the plenum. Add all of that together and the attic can run twenty degrees warmer than outside air during a freeze, which is more than enough to melt the ice on the deck above it. Sealing duct connections and repairing damaged insulation sleeves reduces the heat load significantly and improves your heating efficiency at the same time.
Exhaust venting is the third heat source, and it is the one people forget entirely. Bathroom exhaust fans, kitchen range hoods, and clothes dryers all move warm, humid air, and in a surprising number of homes those ducts terminate inside the attic instead of passing through the roof or a sidewall. That single mistake delivers a steady stream of heat and moisture directly under the roof deck every time someone showers or runs a load of laundry. The heat melts ice on the roof above, and the moisture condenses on the cold sheathing and drips back down into the insulation. Over a few winters that condensation alone can rot the deck, rust fasteners, and grow mold across the underside of the plywood. Every exhaust duct in the house needs to terminate outside the building envelope through a proper hooded vent with a damper. Correcting one improperly terminated bathroom fan often eliminates a persistent ice dam that formed in the same spot year after year.
How Poor Ventilation Causes Ice Dams at the Eaves
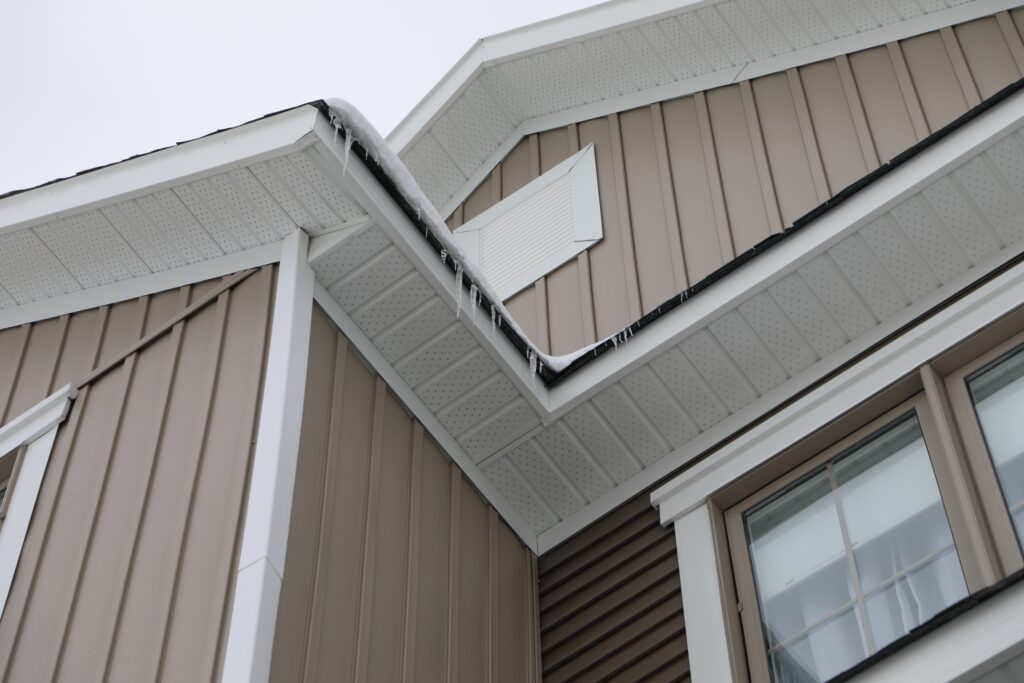
Attic ventilation exists to keep the roof deck close to outdoor temperature, and a balanced system is the second half of ice dam prevention. Balanced means the intake and exhaust are roughly equal, with intake at the soffits along the eaves and exhaust at or near the ridge. Cold outside air enters low, sweeps up the underside of the deck, picks up any heat and moisture that made it past your air sealing, and carries it out the top. When that path works, the deck stays cold, the ice on the roof never melts, and no dam forms. When the intake is blocked or the exhaust is undersized, the attic stagnates and the deck warms. Most building codes call for one square foot of net free ventilating area for every 150 square feet of attic floor, which can be reduced to a ratio of 1 to 300 when the vents are balanced between high and low positions and a vapor retarder is present.
Blocked soffit intake is the most common ventilation failure we find, and it usually traces back to an insulation job done without baffles. When loose fill insulation is blown toward the eaves, it drifts into the narrow space above the exterior wall and packs against the soffit vents. The attic then has plenty of exhaust and almost no intake, so the ridge vent pulls makeup air from inside the house through the same ceiling bypasses discussed earlier. That reverses the entire purpose of the system and actively draws heated air into the attic. Rigid baffles installed at every rafter bay hold the insulation back and preserve a clear channel from the soffit up to the deck. Painted over soffit panels, undersized vent cutouts, and continuous soffit boards with no perforations at all cause the same failure. A quick look up from your driveway on a clear day will tell you a lot about the intake on your own house.
Mixing incompatible exhaust vents creates a subtler but equally damaging problem. Ridge vents, box vents, turbines, and powered attic fans all work by different pressure principles, and installing two types on the same roof plane lets the stronger one pull air from the weaker one instead of from the soffits. A powered fan paired with a ridge vent will short circuit almost immediately, drawing air down through the ridge and depressurizing the attic enough to pull conditioned air out of the house. The result is a warmer attic, higher energy bills, and a roof deck that melts ice unevenly across its surface. Uneven melting is what produces those thick dams in isolated sections while the rest of the eave stays clear. A roofing contractor evaluating your attic should count the net free area of every intake and exhaust opening and confirm that only one exhaust type serves each roof plane. Getting the arithmetic right costs very little during a replacement and pays back every winter afterward.
Why Gutters and Roof Design Cause Ice Dams to Grow
Gutters do not cause ice dams, but they absolutely make them worse once one begins to form. A gutter full of leaves, pine needles, and shingle granules holds water that freezes solid at the first hard night, which creates a starter block of ice right at the eave. Meltwater arriving from above hits that block, stops, and freezes onto it, building the dam upward and backward across the shingles. Clean gutters with clear downspouts at least drain what they receive until the temperature drops far enough to freeze the moving water. Downspouts that discharge onto a walkway or into a buried line that freezes will back up and fill the gutter from the bottom, producing the same result. Cleaning gutters in the fall and confirming that every downspout discharges freely is basic, inexpensive maintenance that pays for itself in a single freeze event. Need your gutters cleared, repaired, or replaced before winter? Click here for our gutter services.
Roof geometry determines where dams form and how large they get. Low slope sections drain slowly, so water lingers longer and has more time to freeze. Valleys concentrate runoff from two roof planes into one narrow channel, which means a valley that terminates at an eave delivers an enormous volume of water to a small cold zone. North facing slopes receive far less sun during winter, so ice that melts off the south side by noon can sit on the north side for a week. Dormers, roof to wall intersections, and areas above unheated garages or porches all create temperature differences that favor ice formation. Complex roofs with many planes and long eaves have more of these vulnerable spots than a simple gable roof does. Knowing where your specific roof is likely to build ice tells you where the underlayment and detailing matter most.
Ice weight itself becomes a structural concern once a dam grows past a few inches. Ice weighs roughly fifty seven pounds per cubic foot, so a dam a foot wide and six inches deep running twenty feet along an eave adds several hundred pounds of load concentrated at the weakest, most cantilevered part of the roof. That load pulls gutters loose from fascia boards, bends hangers, splits fascia, and occasionally tears sections of gutter off the house entirely. Icicles hanging from the edge add to it and create a genuine hazard for anyone walking below. Homeowners sometimes try to chip the ice off with a hatchet or a hammer, which almost always destroys shingles and gouges the metal drip edge underneath. The safe response during an active freeze is a roof rake used from the ground on the lowest three or four feet of roof, along with calcium chloride placed in a fabric sleeve laid across the dam to melt a drainage channel. Rock salt and sodium chloride corrode metal flashing and gutters and kill the landscaping below, so they have no place on a roof.
How to Prevent Ice Dams Before Winter
Ice dam prevention is a sequence, not a single product, and the order matters more than most people expect. Air sealing comes first because it stops the heat at its source. Insulation comes second because it slows whatever heat remains. Ventilation comes third because it flushes away anything that still makes it through. Roofing details come last, functioning as the insurance policy that protects the structure if a dam forms anyway during an extreme event. Homeowners who skip straight to heat cables or a new roof without addressing the attic usually see the dams come right back. Doing the work in late summer or early fall means the attic is accessible, contractors have availability, and the whole system is ready before the first cold front arrives.
Air Sealing the Attic to Prevent Ice Dams
Air sealing means closing every path that lets conditioned air move from the living space into the attic, and it is genuinely the highest value step on this list. Start at the top plates, the horizontal framing members at the top of every interior and exterior wall, where the drywall meets the framing and leaves a gap on both sides. Those gaps run the entire length of every wall in the house and collectively represent more open area than most homeowners would believe. Canned foam handles gaps under about three inches, and rigid foam board sealed at the edges handles the larger chases around flues and plumbing stacks. Recessed can lights need to be either replaced with airtight rated fixtures or covered with a rated enclosure, since older units vent directly into the attic by design. The attic access hatch or pull down stair deserves its own weatherstripping and an insulated cover box, because a bare plywood panel in a ceiling is a large hole in your thermal envelope.
Combustion appliances require special handling, and this is where the work stops being a casual weekend project. Metal flues from water heaters and furnaces get extremely hot and must maintain a specific clearance to combustible materials, typically one inch for type B vent and two inches for single wall pipe. That clearance gets maintained with sheet metal and high temperature sealant, never with expanding foam or fiberglass packed against the pipe. Sealing an attic tighter also changes the pressure balance in the house, which can affect draft on atmospherically vented appliances. A professional will check that water heaters and furnaces still draft properly after the work is done. This is one of several reasons that attic air sealing is worth handing to someone who does it regularly rather than treating it as a first time do it yourself project.
Verification separates real air sealing from the appearance of it. The most reliable check is a blower door test, which depressurizes the house and lets a technician find the remaining leaks by feel or with a thermal camera. Short of that, a cold morning and an infrared camera will show heat plumes rising through unsealed penetrations quite clearly. Many homeowners discover that a room which was always cold in winter and always hot in summer sits directly under the worst leakage. Fixing it improves comfort year round, not just during freeze events. Utility bills typically drop noticeably in both seasons, since the same bypasses that let heat escape in January let cooled air escape in August. In a climate that runs air conditioning six months a year, that alone justifies the project independent of ice dams.
Insulation and Ventilation Upgrades That Prevent Ice Dams
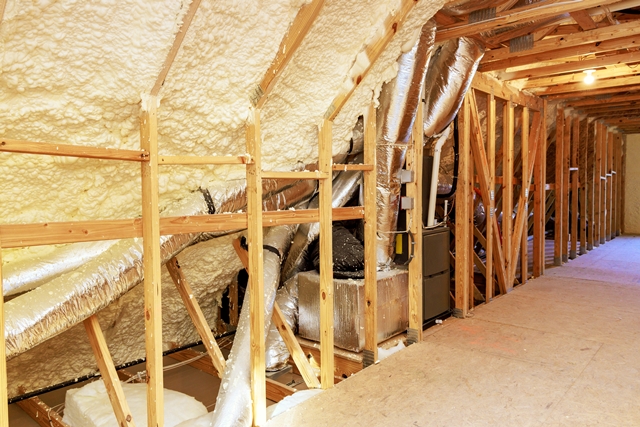
Once the attic floor is sealed, insulation depth becomes the next lever. North Texas sits in climate zone 3, where energy code has historically called for approximately R38 in the ceiling, with newer code cycles pushing toward R49 in many jurisdictions. Plenty of homes built in the 1980s and 1990s still carry R19 or less, and settled loose fill can lose a meaningful fraction of its original depth over three decades. Insulation must also be continuous, meaning it extends fully over the top plate at the exterior wall without leaving a wedge of bare drywall at the perimeter. That perimeter wedge is exactly where ceiling stains show up first when a dam forms, because it is the coldest and least protected part of the ceiling. Adding depth is inexpensive relative to almost any other home improvement, and the material cost per square foot is a fraction of what a single water damage repair runs.
Ventilation upgrades work best when they happen alongside a roof replacement, since that is when the ridge and the deck are already open. A continuous ridge vent cut properly along the peak provides even exhaust across the whole roof plane, which performs better than a scattered handful of box vents. Continuous perforated soffit panels provide the matching intake, and where soffit space is limited, edge vents installed at the eave can supply intake without soffit modification. Baffles at every rafter bay keep the channel open permanently. The goal is a system that produces steady, even airflow from eave to ridge across the entire roof, keeping the deck uniformly cold. Planning a roof replacement and want the ventilation done correctly? Click here for our roofing services.
Cathedral ceilings and vaulted areas need a different approach, and they are frequently the location of stubborn ice dams. There is no attic floor to seal or insulate, so the thermal barrier and the ventilation channel both have to fit within the rafter depth. A vented assembly requires a continuous air channel from the eave to the ridge in every single rafter bay, with no blocking, wiring, or insulation intruding into it. An unvented assembly takes the opposite approach, using closed cell spray foam applied directly to the underside of the deck so that no air moves and no condensation surface exists. Both approaches work when executed correctly, and both fail badly when done halfway. Mixing them, by spray foaming some bays and leaving others vented, produces exactly the uneven deck temperatures that create localized dams. Any contractor working on a vaulted section should tell you clearly which assembly they are building and why.
Roofing Materials and Underlayment That Prevent Ice Dams
Roofing materials do not prevent an ice dam from forming, but the right materials prevent that dam from turning into interior damage. Self adhering ice and water barrier is the key component. It is a rubberized asphalt membrane with an adhesive back that seals around nail penetrations and creates a watertight layer over the deck. In regions with a documented history of ice forming along eaves, code calls for this membrane to run from the lowest edge of the roof to a point at least twenty four inches inside the exterior wall line. Many North Texas jurisdictions do not require it, but after two significant freeze events in recent memory, it has become a sensible upgrade on any home with wide overhangs, low slopes, or a history of ceiling stains. The cost is modest when installed during a full replacement and enormous to add later.
Valleys, roof to wall intersections, and areas around chimneys and skylights all deserve the same membrane treatment for the same reason. Those transitions carry concentrated water volume and involve flashing, and flashing is where standing water finds a way in. Step flashing at a sidewall must be individual pieces woven with each shingle course, not a single continuous strip of bent metal caulked at the top. Kickout flashing at the bottom of a roof to wall junction diverts water into the gutter instead of behind the siding, and its absence causes wall rot that stays hidden for years. Drip edge along eaves and rakes gives water a clean break away from the fascia. These details cost very little in materials and separate a roof that survives a freeze from one that leaks at the first thaw.
Heat cables belong in this discussion, though they belong at the bottom of the list. A properly installed heat cable in a zigzag pattern along the eave with a run down the downspout will melt a drainage channel through a dam and relieve the pressure. Self regulating cable with a thermostatic or moisture activated controller is far more efficient than constant wattage cable left running all winter. That said, heat cables treat a symptom, consume electricity, degrade with sun exposure over several years, and can damage shingles when fastened with clips that puncture the surface. They make sense on a complex roof section where the underlying heat loss genuinely cannot be corrected, such as a dormer over an unconditioned space. They do not make sense as a substitute for sealing an attic. Any contractor who leads with heat cables before looking in your attic is selling you a bandage instead of a repair.
Why You Need an Ice Dam Prevention Inspection Before Winter
An inspection before winter answers the questions that guesswork cannot. A contractor who evaluates both the roof surface and the attic can tell you where heat is escaping, where your ventilation math falls short, and which sections of your roof are most likely to build ice. That combined view matters, because the roof and the attic are one system and diagnosing either one alone produces incomplete answers. Late summer and early fall are the ideal window, since any recommended work can be completed well before the first freeze warning. Estimates are free and carry no obligation, so there is no downside to knowing where your home stands. Homeowners who address these issues in August rarely think about ice dams again in February.
What an Ice Dam Prevention Inspection Covers
A thorough inspection begins on the roof, where a contractor evaluates shingle condition, checks the sealant at every penetration, and inspects the flashing at chimneys, walls, valleys, and skylights. Granule loss, lifted shingles, exposed fasteners, and failed pipe boots all become leak paths the moment water sits on the roof instead of running off it. The eave receives particular attention, since that is where a dam will form and where drip edge and underlayment do their work. Gutters and downspouts get checked for pitch, secure attachment, and clear discharge. The condition of the fascia and soffit tells the inspector how the eave has been handling water so far.
The attic portion of the inspection is where the useful diagnosis happens. An inspector measures insulation depth in several locations, checks that coverage extends fully over the exterior top plates, and looks for the dark staining on insulation that marks an active air leak. Soffit intake gets verified from the inside, since baffles either exist or they do not and blocked bays are obvious from below. Exhaust duct terminations, recessed light fixtures, and the attic hatch all get documented. Any water staining, rusted fasteners, or dark discoloration on the underside of the deck indicates past moisture problems that need explanation. The result is a written list of specific, prioritized items rather than a vague recommendation to add insulation.
The report should give you clear choices at different price points. Some items, like clearing gutters and installing baffles, are inexpensive and deliver immediate benefit. Others, like a full replacement with ice and water barrier at the eaves and a rebuilt ventilation system, represent a larger investment with a longer horizon. Knowing which is which lets you plan rather than react. Want a professional set of eyes on your roof and attic before the season changes? Click here to schedule with our roofing team.
What Ice Dam Damage Costs When Prevention Is Skipped
The bill for ice dam damage rarely stops at the ceiling stain. Water entering above the top plate travels down inside the wall cavity, soaking insulation and framing that nobody can see until the drywall is opened. Wet cellulose or fiberglass loses most of its insulating value and stays wet for weeks in cold weather, which is more than enough time for mold to establish. Repairs commonly involve drywall replacement, repainting, insulation removal, and sometimes flooring and trim in the affected room. A single event routinely runs into several thousand dollars, and that figure does not count the disruption of living through the work.
Insurance treatment varies and deserves a careful read of your own policy rather than an assumption. Many homeowner policies cover sudden and accidental water damage resulting from an ice dam, while excluding damage attributed to long term maintenance neglect or gradual leakage. Documentation matters in either case, which is another argument for having a dated inspection report on file before the season begins. If a claim does become necessary, photographs and a contractor assessment strengthen it considerably. Dealing with storm or freeze damage and unsure how to proceed? Click here to learn about our roofing and restoration services.
The prevention side of the equation is far cheaper than any of this. Air sealing an average attic, adding insulation to current code depth, and installing baffles typically costs a fraction of a single water damage restoration. Those improvements also lower cooling costs through a Texas summer, which means the investment returns value in months when ice is the last thing on anyone’s mind. Every year the work sits undone is another year of paying to condition air that leaks into the attic. There is no scenario where waiting improves the outcome.
Why Choose KG Roofing & Renovations for Ice Dam Prevention
KG Roofing & Renovations holds an A+ rating with the Better Business Bureau and serves homeowners across Mansfield, Arlington, Burleson, Cedar Hill, Midlothian, and the surrounding communities. We are a preferred contractor for IKO and Owens Corning, which means our crews are trained on those manufacturers’ installation systems and our work qualifies for the associated product coverage. Every replacement we complete carries a four year labor warranty on top of the manufacturer material warranty. We approach ice dam prevention as a whole system, looking at the attic and the roof together instead of selling a product and hoping it solves the problem. That approach is why our customers stop having the same leak in the same spot every winter.
Our estimates are free and come with no obligation, and we put the findings in writing so you can compare options honestly. If a repair is all your roof needs, we will tell you that. When a repair is the right call, we apply full credit for that repair toward a future replacement with us, so choosing the smaller fix today never penalizes you later. We handle roofing, gutters, siding, and windows, which means the connected details at the eave and the wall get addressed by one company that is accountable for all of them. Curious about our full range of services? Click here to see what we offer.
The best time to prepare for a freeze is a warm afternoon in late summer, when the attic is accessible, materials are in stock, and schedules are open. Waiting until a hard freeze appears in the forecast puts you in line behind everyone else who waited. A short inspection now gives you a clear picture of your roof, your attic, and what it would actually take to keep water out of your ceiling this winter. We serve homeowners throughout Tarrant, Johnson, and Ellis counties from our office at 1906 Lone Star Rd Suite B in Mansfield, Texas. Call KG Roofing & Renovations at (817) 368-5115 or email info@kgroofs.com to schedule your free inspection and get ahead of the season.